The 21st century has introduced many electronic ways to pay for things. But knowing how to write and read a check is still an important skill in today’s world – and if you don’t know how to do it, you could be at risk. Keep reading to learn about the parts of a check in simple terms and how knowing them can protect you from fraud.
The Front of a Check
A check is a promise to pay someone money. Before cash transfer apps and direct deposits, people wrote checks that were then cashed into the recipient’s account. Checks are full of information that gets money where it’s supposed to go. Each part of a check should be filled out to prevent your money from going to the wrong place.
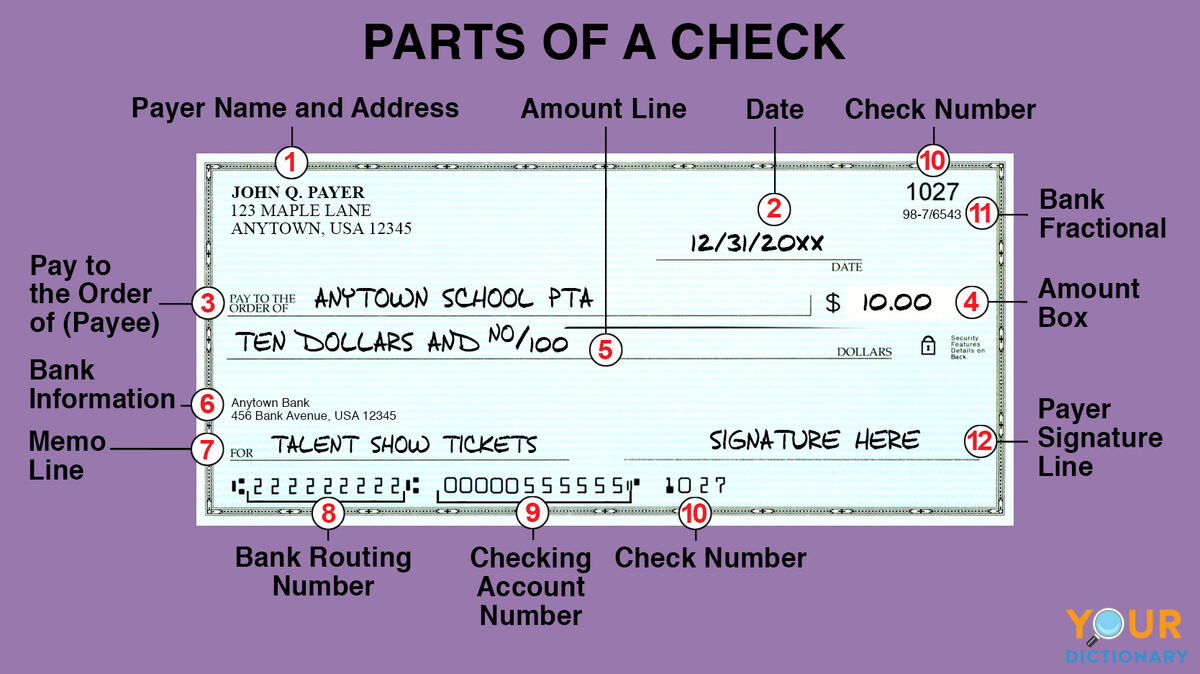
1. Name and Address (Payer)
The upper left corner of a check contains pre-printed personal information for the person who is writing the check, or the payer. Typically, it includes the person’s name and address, but it can also include the company name if the check is coming from a company. When accepting a check, make sure that the name in this section matches the person or group who is giving you the check.
2. Date
You’ll find a blank space for a date near the top right side of the check. This space is for the date that the check was written. In cases where the money isn’t in the account yet, some people may postdate their checks by writing a date in the future. However, once a check has been written, it is legal tender, so postdating a check could be risky if the recipient, or the payee, doesn’t know they shouldn’t cash it yet.
3. Pay to the Order of (Payee)
The line in the middle of the check is for the person, company, or organization who is receiving the check. It’s very important to fill this section out as clearly as possible. If it’s blank, anyone could write their name in this section and take the money meant for someone else. It’s the only section that indicates who the money is going to.
4. Amount Box
A blank rectangle on the right side of the check is for the amount of money being paid. Some checks have a pre-printed dollar sign, while others are totally blank. Be sure to write clearly here as well. If you include an amount that’s higher than what you have in your account, your check might bounce, which means that it will be returned to you and the payee won’t get their money.
5. Amount Line
The line under the payee line is there in case the amount box isn’t clear. Here, you write out in words the number of dollars and cents you are paying. For example, $50 in the amount box becomes “Fifty dollars” on the amount line. If you’re paying a whole dollar amount, include “and no/100” after the amount (“Fifty dollars and no/100) to keep others from adding more words.
6. Bank Information
Under the amount line is where the bank prints its information or logo. The payee can see where their money is coming from in this section. If it’s cashed at the same banking institution, the payee is more likely to receive the amount in full, rather than have some of it put on hold.
7. Memo Line
The bottom line on the left is for the payer to write what the check is for. The memo line is not required, but it’s helpful for two reasons. First, the memo line helps the payee understand what the payer is paying for. Second, the payer can refer back to the check when it appears in their bank statement, and they can remember why they wrote the check.
8. Routing Number
Also known as the ABA (American Bankers Association) routing number, this pre-printed number shows what bank the payer uses. It’s important for setting up direct deposit accounts with employers, but generally only matters between banks. The bottom section of numbers is designed for computer use, which is why it doesn’t look like normal numbers.
9. Checking Account Number
The bottom right number on a check is the payer’s checking account number. It indicates what account the money will be coming from. Like the routing number, the checking account number is mainly for bank use, not payer or payee use.
10. Check Number
The check number shows which check in the pack (usually of 100 checks) was used. It enables the payer to track their payments and balance their account. You may notice that the check number is listed twice, once in the top right corner of the check and once at the bottom.
11. Bank Fractional Number
This little number under the check number is another bank identification number. It verifies that the check is not fraudulent and comes from the bank it claims to come from.
12. Signature
A check isn’t valid unless it’s signed by the person who wrote it. The last blank line on a check, on the bottom right, is for the payer to sign it, making it legal tender. Be sure to sign your check before giving it away, and if you’re cashing a check you’ve received, ensure that the payer has signed it before you deposit it.
The Back of a Check
Did you know that a check is two-sided? The payer fills out the front of the check, but the back of the check is for the payee and the bank. It must be filled out completely in order for the transaction to take place.
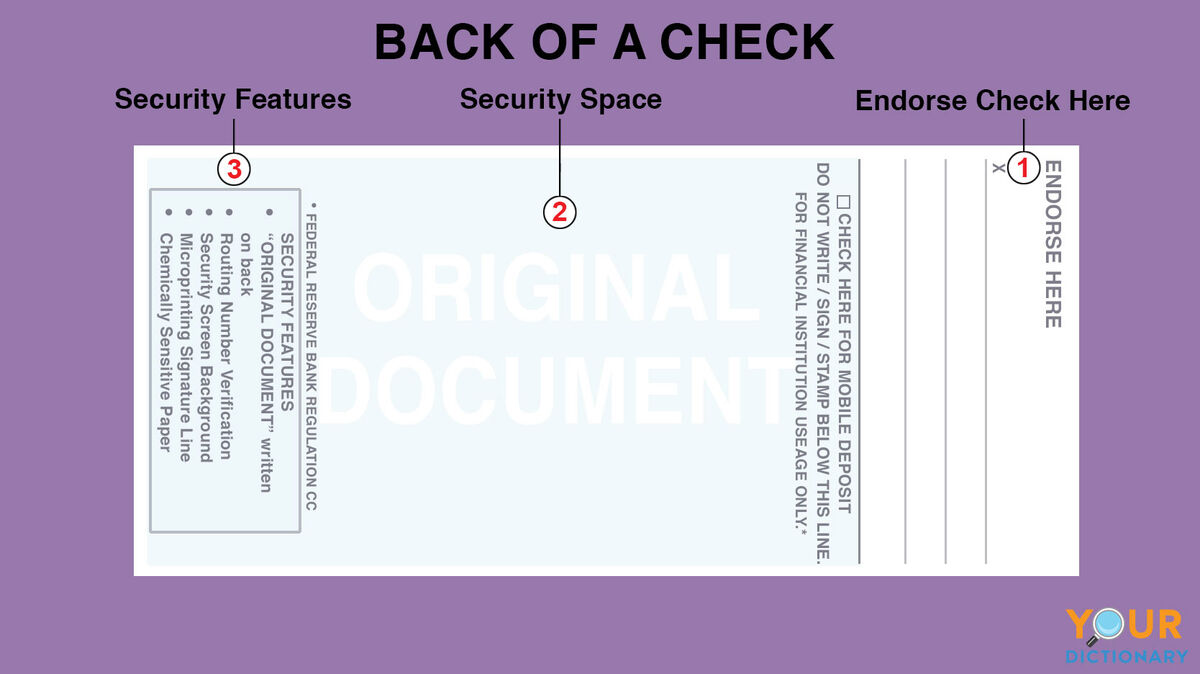
1. Endorse Check Here
At the top of the check is a line that typically says “Endorse Check Here.” That’s for the payee to sign. It’s a good idea to add your account number here as well to make sure the money goes where it should. You can also write “For Deposit Only” as an extra security feature.
2. Security Space
Under the endorsement line is a note that says something like “Do not write below this line.” That space is for the bank to sign or stamp their own endorsement when they transfer funds into your account. It also contains extra security measures like watermarks or special symbols.
3. Security Features
It’s very difficult to create fake checks, but people still try! The security features section explains what features the bank uses to protect your funds. It’s helpful for consumers and lets potential thieves know that they can’t commit fraud at the bank.
Tips for Using Checks
Even if you don’t write checks in your everyday life, chances are that you’ll need to set up a direct deposit account or cash a check that someone writes you. Use these tips for writing and managing checks in your daily life.
- Write very clearly. The payer’s information should be easy to read for both the payee and the bank teller.
- Take up as much space as possible. Don’t leave any blank space on the written lines. This prevents people from adding more money or changing important information.
- Include the .00 in the amount box. Unless you’re writing a check for several thousand dollars, you probably have enough space to include the cents after the dollar amount. Someone can easily add a zero to $50, making it $500, if you leave them space.
- Don’t skip the memo line. If you’re writing a check very quickly, it’s tempting to fill out only the important parts. But the memo line is important, too. Checks that appear in your banking statement can be confusing a month later, especially if you’re writing them quickly. It also helps the payee if they’re receiving a lot of checks at one time.
- Use blank ink when possible. Not only is blank ink easier to see, it’s safer to use. If someone tries to wash your check (using chemicals to erase the ink so they can write in their own amounts), they won’t be successful in removing black ink.
- Don’t just scribble out mistakes. If you accidentally write the wrong date or amount, or spell someone’s name incorrectly, fix the mistake and initial above it. A check with scribbled out sections will be flagged for fraud, and your payee won’t receive their money.
- VOID checks that shouldn’t be cashed. If you made a mistake that you can’t quickly fix, write “VOID” at the top of the check. Banks will know not to cash this check if someone does try to deposit it.
- If someone writes you a check, deposit it quickly. Forgetting about a check can be problematic. If the payer had the money when they wrote the check, they might not have it when you finally get around to depositing it. Most checks expire after six months, and some business checks expire after ninety days.
- Don’t forget to endorse the check, even if you’re depositing it on a device. Depositing checks on banking apps is very convenient. However, don’t skip the endorsement step. Banks still need to verify that the check has gone to the right person, and they might not deposit the money if they’re not sure.
- Carry a blank check with you. Checkbooks aren’t as popular as they used to be. But carrying around one check in your wallet is a good idea in case your device payment method fails, you lose a credit card, you have no cash, or you find a business that only accepts checks. If you lose the check you’re carrying, cancel it with your bank.
Take Control of Your Financial Future
Writing a check correctly helps others to read it correctly – and it protects you and your money. But handling day-to-day transactions is only part of creating a stable financial situation for yourself. Take a look at these five practical financial goals that are easy to understand and important for your future.